Gutters are a crucial part of your home’s structure. They protect it from water damage by directing rainwater away from the foundation. If installed and maintained properly, a quality gutter system can last the lifetime of your home.
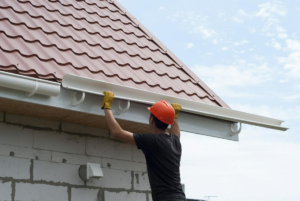
Installing gutters can be a DIY-friendly project, but you’ll need the right tools and safety equipment. Professional contractors will consider your home’s height when estimating cost and timeline. Contact Gutter Installation Tampa now!
Gutters protect your home from roof damage and other outdoor elements. Water runoff from your roof can damage your exteriors and saturate the ground, weakening your house’s foundation. Fortunately, installing a gutter system is relatively simple. However, you’ll need a few important supplies to make the job go quickly and smoothly.
Gutter materials include metal, plastic, and wood. Metal and aluminum are the most popular choices. They’re resistant to moisture and corrosion, lightweight and durable, and available in various colors and styles.
Before installing your gutters, draw a simple sketch of your house to scale and mark the location of any downspouts. You’ll also need to determine how long your gutter runs will be and whether or not they’ll have any corners.
Once you’ve made all these calculations, purchase the necessary guttering material. A basic metal gutter system costs around $50 per section, while a high-end gutter may cost as much as $300 or more.
You’ll also need a ladder and other tools for gutter installation. A ladder is a necessity, even on one-story homes, since you’ll need to be able to safely work from a height above the roof. If you’re using a ladder, it’s a good idea to invest in a pair of safety glasses for protection from debris. Other tools needed for gutter installation include a pair of tin snips, a ladder strap, and a caulking gun.
Whenever you’re cutting a gutter, be sure to use tin snips instead of a hacksaw, which can cause serious injury. Also, always cut on a flat surface, and use heavy-duty blades. Lastly, always follow the instructions that come with your tin snips, which will typically recommend a specific angle for corner cuts.
For aluminum gutters, a crimping tool will help you get the most out of your gutter system. Place the gutter against the wall, then use the crimper to press down on both the long and narrow sides of the section. The resulting crease will keep your gutters from rusting.
Removal of Existing Gutters
Before starting the new gutter installation process, it’s important to remove any existing gutters that are in disrepair. Gutters that are leaking can damage your roof, siding, and foundation and cause premature deterioration of your home’s structure. Depending on the condition of your gutters, you may need to replace them completely.
It’s a good idea to hire a professional for this job. Unless you have extensive experience with roofs and gutter systems, it’s usually not a project that is well-suited for DIY. A professional can ensure that the job is done correctly and safely. It can also reveal maintenance issues that need to be addressed, such as rot or other water damage.
If you decide to tackle this project yourself, it is a good idea to make a detailed plan and take steps to protect your health and safety. Make sure you have the right tools and a ladder that is stable and secure. Be sure to wear gloves and use a dust mask. Also, be aware that some gutter pieces have sharp edges and can cause harm if not handled properly.
Using the appropriate tools and techniques, you should be able to disconnect any clamps or screws that are holding the downpipe in place. Then, loosen the downpipe from the gutter with a flathead screwdriver or pliers. You may need to hammer or pry at the downpipe with a metal chisel or hammer, particularly around its circumference. You should try to disconnect the downpipe from both ends of the gutter run.
Once the downspouts are disconnected, you can start to remove the gutters. If the gutters are screwed, nailed, or riveted in place, it is a good idea to mark their locations on the fascia boards before beginning the removal. This will help you to install the new gutters correctly and avoid any mismatched areas.
Downspouts are a crucial component of any gutter system. They are what drains water away from your home and prevents it from collecting near the foundation, which can lead to serious damage. You can choose from a variety of downspout sizes and styles. Some even have decorative accents to match the style of your house.
Slope
Gutters must have a certain slope to ensure that rainwater flows freely into downspouts and away from the house. If gutters are not properly sloped, water may accumulate inside the gutter and spill over the sides during heavy rainfall. This overflow can lead to erosion around the foundation, mold and moss growth in and around the gutters, and structural instability over time. Gutters without the proper slope can also look crooked and reduce curb appeal.
The ideal slope of a gutter is 1/4 inch per 10 feet of run, but this can be adjusted as necessary depending on the location and roof pitch. Professional installers will adjust the gutter slope during installation using adjustable gutter hangers. These are installed along the fascia board (where the gutters attach) and can be raised or lowered to create the desired slope.
You can check the slope of your gutters by observing how the water flows during a rainstorm. Standing water in the gutters is an indication that the gutters are not sloped correctly, and that they need to be re-pivoted or replaced altogether. Water that rushes through the gutters too quickly, on the other hand, is a sign that the gutters are sloped too steeply and can cause overflows.
Gutter slope is a relatively simple concept, but it does require a level and tape measure to accurately measure the gutter run. If your gutters are already sloped, you can confirm that they have the correct slope by measuring down from the top of the gutter with a level aligned to the bottom edge and checking the measurement.
If your gutters are not properly sloped, you can manually adjust the slope by driving a nail 1/2-in. below the shingles on the high side of the gutter run and marking this point on the fascia board with a chalk line. Then, subtract 1/4-in. for every 10 feet of gutter length from the mark you made and make a second mark at this distance on the low side of the gutter run. Align a level with the second mark and use it to draw a line for your gutters to follow, making sure that the slope is at the right angle for effective drainage.
Installation
Gutters control the drainage of rainwater from your roof, directing it away from the foundation of your house and preventing water damage to landscaping and greenery around the home. They also help prevent erosion that can saturate soil, jeopardizing the life of nearby plants and trees.
Before installing gutters, assess the existing condition of your current gutters and downpipes. Check for leaks and signs of rot. If you find any problems, it’s a good idea to hire a professional to install your new gutters and downpipes.
The cost of gutter installation varies according to the size of your home and its height. It’s generally more expensive to install two-story or higher homes than one-story homes, as there is more work involved in working at such a height. In addition, a multi-story gutter system often requires the use of scaffolding to allow for safe and easy access.
To determine how much gutter material is needed, measure the dimensions of your roof edges and identify locations for downspouts, which should be placed at least every 40 feet along a gutter run. Using these measurements, calculate the total length of gutter needed and add 10% to this figure to account for waste and mistakes during installation.
Do-it-yourself gutters come in 10-foot sections that are seamed together with a special bracket and sealant. One-half of the seam can be completed on the ground before hanging each section, and the brackets should be attached to the fascia board with long screws that penetrate rafters 2 inches (as shown). Once a gutter section is in place, snap a line of chalk vertically down its center to establish the desired slope of the downspout outlet.
If a downspout outlet is too low, move it up against the corner trim and attach a U-bracket to the fascia with a pair of sheet metal screws that are 12-inch wide and have a flanged nut. Overlap the next section by 8 inches and secure it to its predecessor with self-tapping 3/8-inch-long stainless steel screws or aluminum pop rivets, in two rows of four each.